Tuesday, October 22, 2013

"The Owl and Pussycat" block..........................


Well we’ve had our first snow in this area (Kansas, USA).  They say the day the first snow falls is how many snows you’ll get in the coming winter.  Hope that’s not true cause if it is we can look to have 18 snows this winter.  That’s a lot of snows and a lot of shoveling.  When the snow falls I fill like its time to get out the Crockpot and make soup.  Guess I better be finding some new recipes for soups if I’m making 18 this winter.  

The Owl and Pussycat is such a cute block that goes with the “Mother Goose” quilt.  Again it’s made with scraps out of your own stash.  You pick and choose what goes where.  I basically did it the same way as I did on the other blocks.  On the Pussycat’s face I embroidered the nose with 2 strands of black floss verses blanket stitching a black nose on it.  This would be up to you how you’d like to do it because I do it both ways. For the eyes again I used black glass beads (used in jewelry making).  I like the look of it but you can use tiny buttons. 

Looking at this block doesn’t it make you feel like you’re in the boat? The waves to me create that feel. They’re so happy.

Be sure to check back while I continue on with the next block.  

Oh and if you have a good soup recipe send it my way.

So keep on stitchin,
Connie

Wednesday, October 9, 2013

Little Bo Peep

This has really been a fun project to work on.  I come home from work, make supper and then try and go to my sewing room even if its for a few minutes.  Just sit at the machine and listen to it hum around each piece. 

Little Bo Peep is another block that goes in the Mother Goose Nursery Quilt along with the Humpty Dumpty post I did on my blog.

This is another block where you can use any scraps that you might have stashed away. Put fabrics together that you wouldn't even consider putting together and see how it comes to life.

Background is 14 1/2" x 14 1/2" with 2 1/2" strips for borders.  Trace pieces of block unto fusible web.  Then cut out the pieces leaving a 1/4" inch around each piece. Match pieces to color of scraps that you would like to use for that piece.  Blanket stitch with sewing machine or by hand using the color of your choice for that particular piece.

Attach black buttons, I used glass beads used in jewelry making, for eyes on Bo Peep and her sheep.

Blush cheeks using makeup or pencil (which on this picture I forgot to do).

Then embroider using how many strands of thread you want, I chose 2 strands of black, the words "Little Bo Peep."

I think the next block will be "Owl and Pussycat."  Check back and see how this quilt comes to life with each block.  I'm doing all 9 blocks!

In the meantime,
Keep on stitchin'

Connie

Thursday, October 3, 2013

Humpty Dumpty..........


What child or even parent doesn’t like Mother Goose Nursery Rhythms! Brings back a lot of memories when your children or grandchildren were growing up doesn’t it?

I want to talk about “Humpty Dumpty” today.  This is the first block of many nursery rhythms and the block finished measures 18” x 28”..  The first thing I did on this block was embroidered the “Humpty Dumpty” in black with 2 strands of embroidering floss.  The pattern called for 4 strands but I choose 2 strands because I didn’t like it that heavy looking so you will have to decide what you like. I also embroidered the mouth using 2 strands of thread.  Using scraps from your stash pick out a scrap for each piece in the pattern.  Trace each pattern piece on fusible web.  Hint:  make sure you transfer pattern on the glue side of your fusible web.  Be sure to leave ¼” around outside of pattern when you are cutting the fusible web out to iron onto material.  Iron onto the wrong side of the scrap that you have picked out for that pattern piece.  Now cut out each piece on the tracing line. Cutting on the tracing line will seal your threads and help with fraying edges.  Now remove the paper backing on your fusible web.  The next step is like putting a puzzle together.  Lay all your pieces out like pattern shows on your background fabric.  Remember dotted lines indicate where one shape overlaps another.  Iron in position when you are happy with layout.  Here you can iron the whole appliqué or iron piece by piece.  This is depending how you are going to blanket stitch your appliqué.  I choose to do it piece by piece with the blanket stitch on my machine.  I also try to use the same color thread to match the color of the material I am sewing on.  Sometimes I will just use white for a contrast so it’s up to you what colors to use.  They suggest you use color threads to match to appliqué shapes for a classic look or a darker shade of thread for a more dramatic look.  Attach buttons for eyes.

Doesn’t that look like a fun “Humpty Dumpty” that any kid would enjoy having for a quilt or wall hanging in his/her room? 

Check back and watch for more blocks from this series.

Keep stitchin……
Connie


Monday, September 16, 2013

Rag-Edge Applique


Today I want to talk about a different way to do edging in quilting. Most people will do appliquéing by needle turn, satin stitch, or blanket stitch but this one is called rag-edge appliqué.  This pattern is called “French Roses” by Heather French.  This is a fun project for everyone to try regardless how much you’ve quilted.  The rag-edge appliqué is done with each rose and gives it a nice soft edge around the petals.  After washing and drying (the more you wash the more it frays out) you will be amazed at how it looks, so soft and comes to life.


This type of appliquéing doesn’t have to stop with just flowers.  You can apply this to any quilt that has circles, another type of flower, anything that can be appliquéd.  Lynne Hagmeier, owner of Kansas Troubles uses this technique in her quilts.  She is a well known fabric designer for Moda fabrics, books and lots of patterns and is from the Bennington, Kansas area.  Check her out at http://www.ktquilts.com/ or http://kansastroublesquilters-lynne.blogspot.com/.  She has some fun things going on!


So here's a different way to applique.  Give it a try and see what you think.

So for now keep that sewing machine a stitchin,

Until next time,
Connie

Wednesday, September 4, 2013

Celebrate Christmas with Santas' Special Reindeer


Christmas in July!  Already here and only 4 months till Christmas.  Wow! Where does the time go?
So have you decided you're going to quilt something for your granddaughter, grandson or maybe just to give it to someone special?  You need to start thinking about what colors, design you would like to use and get started.  I'm making 3 quilts for grandsons and have 2 out of 3 done and ready for the quilter so I feel pretty good.

I'm going to call this a wallhanging and I think its so cute.  The size is 40 1/4" x 50 3/4" and could also be called a crib size.  How can you not like Rudolph?  This particular quilt was in "Quiltmaker" magazine, Nov/Dec 2012 called "Jingle Patch" on page 42.  This is from a Patch Pal's collection and is the last one of the series.  To see all the collections go to quiltmaker.com/patchpals. 

You can use a lot of your scraps on this quilt especially the green background.  The trees wouldn't have to be made out of the same fabric and there again you could use your stash.  It's just a lot of fun to mix and match with you're fabric.

So get in the Christmas spirit and start thinking about what you'd like to sew.  Hope you enjoyed the Reindeer quilt as much as I had fun sewing it.

Keep Stitchin,
Connie

Tuesday, April 30, 2013

Summer is for Flip Flops (Quilt)

Summer is almost here!  Well we know it’s coming but we’re really waiting for Spring to appear and stay.  One day we have 70’s even 80’s and then the next day we have rain, sleet or snow.  Winter just doesn’t want to leave Kansas for some reason.  I know the heat is almost here and I hate hot, hot weather.

This wall hanging I want to share with you today reminds me of Summer.   There are many styles of flip flops, many colors and all ages wear them.  These flip flops are made of bright colors with a flower design in the center.  On the straps I used different yo yo’s, a small circle and a small heart to finish off the straps.  The pattern had small flowers attached to the straps but you could try decorative buttons.   I used an eight inch square for the flip flops and then used the remaining material to make the straps. I then sewed the flip flops and center flower down with invisible thread after adhering them with Seam n Seam.  Templates for the flip flops and leaves (center) were included in the pattern. 

This pattern was in the “Quiltmaker” August 6, 2012 magazine named “Flip Floppy Flower.”  The lady that designed this wall hanging was on a trip to Alaska when she saw flip flops arranged in a giant circle attached to a wall of a shoe store.  This inspired her to make a flip flop flower quilt.  This should tell you that you can take any design from anything and make it into a quilt.

I made this quilt for my friend that owns a quilt shop “Kessler Kreations” in Hillsboro, Kansas.  She sells fabric, quilting supplies, has classes and does beautiful longarm quilting.  She does beautiful custom quilting.  If you’re ever in the area be sure to stop in and see her shop located on Main Street.  It’s really a neat shop.  Oh and she has kits for this flip flop wall hanging available.  Tell her you saw it on my blog. 

Well better get working on my next quilt. Thanks for stopping in and keep checking my blog for new quilt ideas.

Keep Stitchin,

Connie

Friday, April 19, 2013

Pinwheel Quilt...................

Well Spring is suppose to be here according to the calendar.  Once the calendar said its Spring then we get Winter weather.  We’ve had snow, sleet, hail and then two days later we have nice weather in the 60’s and 70’s with rain.  We need the precipitation so I’m not complaining.  Would be nice to put my coat away and leave it in the closet.  I keep telling myself it will get here then you’ll complain about it being to hot!  Never happy are we!!

Today I want to talk and show you a small quilt, 26” x 30” that I made my granddaughter, Mariah.  It is so much fun watching her with this quilt.  She’ll lay it across her lap and just rub her hands over it.  I’ve seen her laying on it and again just rubbing her hands on it.  She’ll sit there with it on her lap and look at her books.  I do believe she might like my quilts!  Maybe some day another quilter in the family?

This pattern is from the book Country Threads Goes to Charm School.  I have used this book numerous times because I love to use Charm Packs.  The pattern is called “Use A Napkin” because we have to remind our kids “Don’t wipe your fingers on the quilts – use a napkin.”  I thought that was cute.
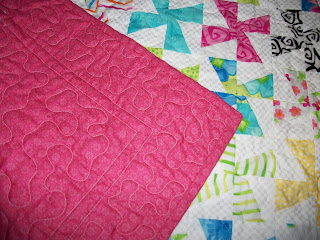
To refresh your memory a charm pack is 5” x 5” squares and depending on the company you buy from charm packs can have up to a quantity of 43 squares in a pack.  For this quilt you will need 30 squares of different colors and ½ yard of the background material.  In the book is a mini windmill template, using with a  2 ½” square, that you can cutout of cardboard or acrylic.  I used the cardboard back from the charm pack.  Worked great! 

On this particular quilt you will cut the 5" squares in half.  You will get four windmills out of each square.  If you don’t have a charm pack you can cut 2 ½” x 20” strips of 10 different colors. Then use your template to cut the windmills out.

This is a fun quilt to make, a different type of pinwheel.  I like this pattern because you don't have all the bulk of material in the center.  This would also be a great quilt to use up scraps that you have.  I love the bright colors and so does Mariah.

Give this quilt a try and let me know what you thought of it.

Keep stitchin' and until next time, thanks for stopping in……..

Connie