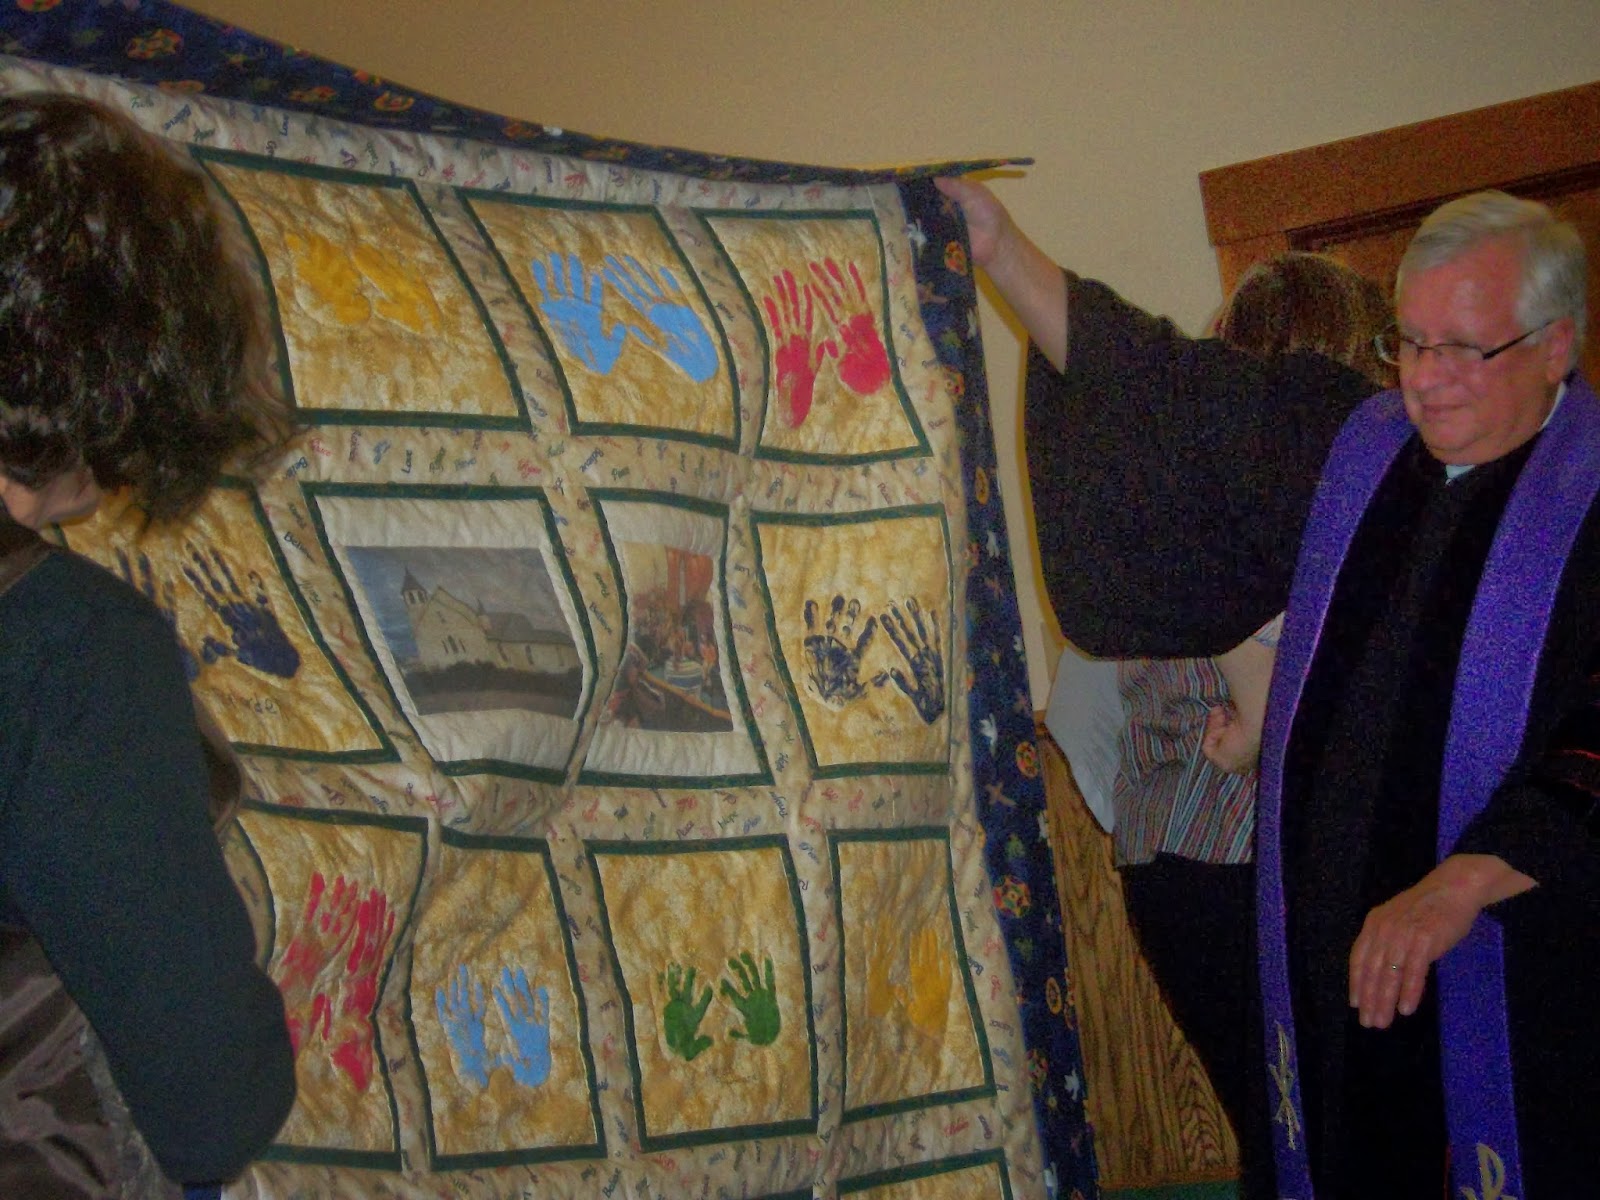
On December 22, 2013 our Sunday School children presented our preacher, Dr. Gary and his wife, MiMi with this "Handprint With Love" quilt during the Children's Sermon.
The children each took a turn picking out the color of paint and then rubbing the paint on there hand and laying it on the fabric. When the fabric was dry I heat set it by ironing. I then added sashing between each block and joined the blocks together with another long piece of sashing. Added borders of darker material to finish it off. I used 2 pieces of religious material in this quilt with religious symbols and words of many colors.
The machine quilter set off the hands by quilting around them. Then finished the blocks with a stitch in a ditch.
The preacher and his wife were very excited that something this special was made for them and will cherish it.
To end the blog I'd like to let you read what the children said before they presented the quilt:
Dr. Gary........
Our God has sent you to this place
To lead us in the way
That He would have us work and think
And live from day to day.
We thank you for your ministry.
Your guidance and your care.
His greatest blessings for your life
Is our most humble prayer.
Another child read:
MiMi....
When we thank God for our pastor
We must give Him thanks for two.
For when your husband came to us,
God also sent us you.
A pastor's wife must be many things.
You have many hats to wear,
And we say thanks for all you do
And lift you up in prayer.
Another child read:
With our hands we made this quilt,
We each made a special part,
To show you that you warm our heart
And the friendship that we share.
It was fun to watch the children eyes during the time when Dr. Gary and MiMi were opening the gift.
Well keep on stitchin, until next time,
Connie
Monday, January 6, 2014
Monday, November 11, 2013
T Shirt quilt...................
NOTE: not sure where the gray box came from and can't delete it so please ignore it. Doesn't show in my draft??
Here it is in November already and Christmas decorations have been out for awhile I in the stores. Many Christmas open houses were this last weekend and more to check out in the coming weeks. We have a landscaping nursery here in town that has an open house every year at this time and it is just beautiful. Over 40 decorated trees in this building that are 3 ft and over. Every color of Christmas tree decorated to the fullest. Ornaments and sprigs of glittery silver, gold, red, green and even harvest colors stuck in the trees. Check out there website www.stonecreeknursery.com. Be sure to click on Video tab and watch Larry decorate old with the new. Some of the things he comes up with are so easy but you have to think outside of the box. He does a great job with decorating. Really enjoy visiting and shopping in this store.
Anyway, today I want to talk about T shirt quilts. Christmas is a time to make and give a T
shirt quilt to your son, daughter or maybe T shirts that your grandson or
granddaughter wore. T shirts vary in all
sizes so you will have to figure out how you want to make it. Don’t get scared thinking “I can’t do it.” Yes you can.
Measure the T shirts and see which one is the biggest and then cut them all
out the same size. If one T shirt is to
small maybe you can incorporate some of the wording or pictures from the back
of the shirt. Use your imagination! Add sashing between the shirts or use left
over T shirt material. There are several
websites that you can read up on T shirt quilts like how to stabilize your T
shirt so it doesn’t stretch on you. So
check it out and start cutting! They
will be so excited to receive this quilt.
I've taken a picture of one of the blocks that I used to show you how this one was put together and the quilting around it. You don't have to quilt a lot if you choose not to. Some just like the emblem quilted and no quilting around it. It's up to you. It's your quilt. This particular quilt was made for my niece, Kelcie for her High School graduation. The school colors were red, black and white.
Just have fun. It's easier than it looks so give it a try!
Back to the sewing machine,
Keep on Stitchin'
Connie
I've taken a picture of one of the blocks that I used to show you how this one was put together and the quilting around it. You don't have to quilt a lot if you choose not to. Some just like the emblem quilted and no quilting around it. It's up to you. It's your quilt. This particular quilt was made for my niece, Kelcie for her High School graduation. The school colors were red, black and white.
Just have fun. It's easier than it looks so give it a try!
Back to the sewing machine,
Keep on Stitchin'
Connie
Tuesday, November 5, 2013
Little Boy Blue...........................
Come blow your horn
The sheep’s in the meadow
The cows in the corn…….
How can you not like nursery rhymes? This is another block that goes with the Mother Goose quilt. I bring each block to work and show my friends and they just loved this one.
Again this block is just made out of scraps and everyone has a stash that
they’d like to use up. So try it! Even if you don’t have a grandchild, don’t
want to make all the blocks, use it in the center and create other blocks to go
with it. Use your imagination.
Watch for the next block.
Keep on stitchin’
Connie
Monday, November 4, 2013
Time for everything...................
There is a time for everything,
A season for all
things under heaven.
A time to be born, a
time to die.
A time to plant, a
time to harvest…
A time to grieve, a
time to dance.
A time to scatter
stones, a time to gather stones.
A purpose for all
things under heaven.
Ecclesiastes 3: 1-2,
4-5
This is one of my favorite versus out of the Bible. There’s always time, you just have to make time. Life is very short sometimes so let’s make the best of things now and make time for things we love to do besides being with family.
I know one of the
things I love to do is sew. I will make
time for sewing because it is a stress reliever for me even if I have to resew
something. During my childhood I joined
4H and learned to sew. I didn’t like
sewing because I seem to have to rip a bunch because my body wasn’t
perfect. Ha Ha I sewed off and on during high school but
after high school sewed very little. Then
I found a wall hanging I wanted to try for Christmas. That’s when I fell in love with quilting. I’ve been quilting ever since.
This wall hanging is
made with scraps of dark and medium fabrics that I had in my stash. Then I sent it to my quilter and let her
stipple all over it. Really liked the
way it turned out. I’ve also made a few extras
and handed them out when I needed a quick gift.
Using scraps the only expense you have is the panel and quilter if you
decide to take it to a quilter.
So don’t just walk by
the panels in your quilt store. Check
them out and do a log cabin design around the outside. Quick and easy.
Keep Stitchin’
Connie
Tuesday, October 22, 2013
"The Owl and Pussycat" block..........................
Well we’ve had our first snow in this area (Kansas, USA). They say the day the first snow falls is how
many snows you’ll get in the coming winter.
Hope that’s not true cause if it is we can look to have 18 snows this
winter. That’s a lot of snows and a lot of
shoveling. When the snow falls I fill
like its time to get out the Crockpot and make soup. Guess I better be finding some new recipes
for soups if I’m making 18 this winter.
The Owl and Pussycat is such a cute block that goes with the
“Mother Goose” quilt. Again it’s made
with scraps out of your own stash. You
pick and choose what goes where. I basically
did it the same way as I did on the other blocks. On the Pussycat’s face I embroidered the nose
with 2 strands of black floss verses blanket stitching a black nose on it. This would be up to you how you’d like to do
it because I do it both ways. For the eyes again I used black glass beads (used
in jewelry making). I like the look of
it but you can use tiny buttons.
Looking at this block doesn’t it make you feel like you’re
in the boat? The waves to me create that feel. They’re so happy.
Be sure to check back while I continue on with the next
block.
Oh and if you have a good soup recipe send it my way.
So keep on stitchin,
Connie
Wednesday, October 9, 2013
Little Bo Peep
This has really been a fun project to work on. I come home from work, make supper and then try and go to my sewing room even if its for a few minutes. Just sit at the machine and listen to it hum around each piece.
Little Bo Peep is another block that goes in the Mother Goose Nursery Quilt along with the Humpty Dumpty post I did on my blog.
This is another block where you can use any scraps that you might have stashed away. Put fabrics together that you wouldn't even consider putting together and see how it comes to life.
Background is 14 1/2" x 14 1/2" with 2 1/2" strips for borders. Trace pieces of block unto fusible web. Then cut out the pieces leaving a 1/4" inch around each piece. Match pieces to color of scraps that you would like to use for that piece. Blanket stitch with sewing machine or by hand using the color of your choice for that particular piece.
Attach black buttons, I used glass beads used in jewelry making, for eyes on Bo Peep and her sheep.
Blush cheeks using makeup or pencil (which on this picture I forgot to do).
Then embroider using how many strands of thread you want, I chose 2 strands of black, the words "Little Bo Peep."
I think the next block will be "Owl and Pussycat." Check back and see how this quilt comes to life with each block. I'm doing all 9 blocks!
In the meantime,
Keep on stitchin'
Connie
Little Bo Peep is another block that goes in the Mother Goose Nursery Quilt along with the Humpty Dumpty post I did on my blog.
This is another block where you can use any scraps that you might have stashed away. Put fabrics together that you wouldn't even consider putting together and see how it comes to life.
Background is 14 1/2" x 14 1/2" with 2 1/2" strips for borders. Trace pieces of block unto fusible web. Then cut out the pieces leaving a 1/4" inch around each piece. Match pieces to color of scraps that you would like to use for that piece. Blanket stitch with sewing machine or by hand using the color of your choice for that particular piece.
Attach black buttons, I used glass beads used in jewelry making, for eyes on Bo Peep and her sheep.
Blush cheeks using makeup or pencil (which on this picture I forgot to do).
Then embroider using how many strands of thread you want, I chose 2 strands of black, the words "Little Bo Peep."
I think the next block will be "Owl and Pussycat." Check back and see how this quilt comes to life with each block. I'm doing all 9 blocks!
In the meantime,
Keep on stitchin'
Connie
Thursday, October 3, 2013
Humpty Dumpty..........
What child or even parent doesn’t like Mother Goose Nursery Rhythms!
Brings back a lot of memories when your children or grandchildren were growing
up doesn’t it?
I want to talk about “Humpty Dumpty” today. This is the first block of many nursery
rhythms and the block finished measures 18” x 28”..
The first thing I did on this block was embroidered the “Humpty Dumpty”
in black with 2 strands of embroidering floss.
The pattern called for 4 strands but I choose 2 strands because I didn’t
like it that heavy looking so you will have to decide what you like. I also
embroidered the mouth using 2 strands of thread. Using scraps from your stash pick out a scrap
for each piece in the pattern. Trace each
pattern piece on fusible web. Hint:
make sure you transfer pattern on the glue side of your fusible
web. Be sure to leave ¼” around
outside of pattern when you are cutting the fusible web out to iron onto
material. Iron onto the wrong side of
the scrap that you have picked out for that pattern piece. Now cut out each piece on the tracing line. Cutting
on the tracing line will seal your threads and help with fraying edges. Now remove the paper backing on your fusible
web. The next step is like putting a
puzzle together. Lay all your pieces out
like pattern shows on your background fabric.
Remember dotted lines indicate where one shape overlaps another. Iron in position when you are happy with
layout. Here you can iron the whole appliqué
or iron piece by piece. This is
depending how you are going to blanket stitch your appliqué. I choose to do it piece by piece with the
blanket stitch on my machine. I also try
to use the same color thread to match the color of the material I am sewing
on. Sometimes I will just use white for
a contrast so it’s up to you what colors to use. They suggest you use color threads to match
to appliqué shapes for a classic look or a darker shade of thread for a more
dramatic look. Attach buttons for eyes.
Doesn’t that look like a fun “Humpty Dumpty” that any kid
would enjoy having for a quilt or wall hanging in his/her room?
Check back and watch for more blocks from this series.
Keep stitchin……
Connie
Subscribe to:
Posts (Atom)