Monday, November 11, 2013

T Shirt quilt...................


NOTE:  not sure where the gray box came from and can't delete it so please ignore it.  Doesn't show in my draft??

Here it is in November already and Christmas decorations have been out for awhile I in the stores.  Many Christmas open houses were this last weekend and more to check out in the coming weeks.  We have a landscaping nursery here in town that has an open house every year at this time and it is just beautiful.  Over 40 decorated trees in this building that are 3 ft and over.  Every color of Christmas tree decorated to the fullest.  Ornaments and sprigs of glittery silver, gold, red, green and even harvest colors stuck in the trees.  Check out there website www.stonecreeknursery.com.  Be sure to click on Video tab and watch Larry decorate old with the new.  Some of the things he comes up with are so easy but you have to think outside of the box.  He does a great job with decorating.  Really enjoy visiting and shopping in this store.

Anyway, today I want to talk about T shirt quilts.  Christmas is a time to make and give a T shirt quilt to your son, daughter or maybe T shirts that your grandson or granddaughter wore.  T shirts vary in all sizes so you will have to figure out how you want to make it.  Don’t get scared thinking “I can’t do it.”  Yes you can.  Measure the T shirts and see which one is the biggest and then cut them all out the same size.  If one T shirt is to small maybe you can incorporate some of the wording or pictures from the back of the shirt.  Use your imagination!  Add sashing between the shirts or use left over T shirt material.  There are several websites that you can read up on T shirt quilts like how to stabilize your T shirt so it doesn’t stretch on you.  So check it out and start cutting!  They will be so excited to receive this quilt.

I've taken a picture of one of the blocks that I used to show you how this one was put together and the quilting around it.  You don't have to quilt a lot if you choose not to.  Some just like the emblem quilted and no quilting around it.  It's up to you. It's your quilt.  This particular quilt was made for my niece, Kelcie for her High School graduation.  The school colors were red, black and white.

Just have fun.  It's easier than it looks so give it a try!

Back to the sewing machine,

Keep on Stitchin'
Connie

Tuesday, November 5, 2013

Little Boy Blue...........................


Little Boy Blue
Come blow your horn
The sheep’s in the meadow
The cows in the corn…….


How can you not like nursery rhymes?  This is another block that goes with the Mother Goose quilt.  I bring each block to work and show my friends and they just loved this one. 

Again this block is just made out of scraps and everyone has a stash that they’d like to use up.  So try it!  Even if you don’t have a grandchild, don’t want to make all the blocks, use it in the center and create other blocks to go with it.  Use your imagination.

Watch for the next block. 

Keep on stitchin’
Connie

Monday, November 4, 2013

Time for everything...................


There is a time for everything,
A season for all things under heaven.
A time to be born, a time to die.
A time to plant, a time to harvest…
A time to grieve, a time to dance.
A time to scatter stones, a time to gather stones.
A purpose for all things under heaven.

Ecclesiastes 3: 1-2, 4-5


This is one of my favorite versus out of the Bible. There’s always time, you just have to make time.  Life is very short sometimes so let’s make the best of things now and make time for things we love to do besides being with family. 

I know one of the things I love to do is sew.  I will make time for sewing because it is a stress reliever for me even if I have to resew something.  During my childhood I joined 4H and learned to sew.  I didn’t like sewing because I seem to have to rip a bunch because my body wasn’t perfect.  Ha Ha  I sewed off and on during high school but after high school sewed very little.  Then I found a wall hanging I wanted to try for Christmas.  That’s when I fell in love with quilting.  I’ve been quilting ever since.

This wall hanging is made with scraps of dark and medium fabrics that I had in my stash.  Then I sent it to my quilter and let her stipple all over it.  Really liked the way it turned out.  I’ve also made a few extras and handed them out when I needed a quick gift.  Using scraps the only expense you have is the panel and quilter if you decide to take it to a quilter. 

So don’t just walk by the panels in your quilt store.  Check them out and do a log cabin design around the outside.  Quick and easy.

Keep Stitchin’
Connie


Tuesday, October 22, 2013

"The Owl and Pussycat" block..........................


Well we’ve had our first snow in this area (Kansas, USA).  They say the day the first snow falls is how many snows you’ll get in the coming winter.  Hope that’s not true cause if it is we can look to have 18 snows this winter.  That’s a lot of snows and a lot of shoveling.  When the snow falls I fill like its time to get out the Crockpot and make soup.  Guess I better be finding some new recipes for soups if I’m making 18 this winter.  

The Owl and Pussycat is such a cute block that goes with the “Mother Goose” quilt.  Again it’s made with scraps out of your own stash.  You pick and choose what goes where.  I basically did it the same way as I did on the other blocks.  On the Pussycat’s face I embroidered the nose with 2 strands of black floss verses blanket stitching a black nose on it.  This would be up to you how you’d like to do it because I do it both ways. For the eyes again I used black glass beads (used in jewelry making).  I like the look of it but you can use tiny buttons. 

Looking at this block doesn’t it make you feel like you’re in the boat? The waves to me create that feel. They’re so happy.

Be sure to check back while I continue on with the next block.  

Oh and if you have a good soup recipe send it my way.

So keep on stitchin,
Connie

Wednesday, October 9, 2013

Little Bo Peep

This has really been a fun project to work on.  I come home from work, make supper and then try and go to my sewing room even if its for a few minutes.  Just sit at the machine and listen to it hum around each piece. 

Little Bo Peep is another block that goes in the Mother Goose Nursery Quilt along with the Humpty Dumpty post I did on my blog.

This is another block where you can use any scraps that you might have stashed away. Put fabrics together that you wouldn't even consider putting together and see how it comes to life.

Background is 14 1/2" x 14 1/2" with 2 1/2" strips for borders.  Trace pieces of block unto fusible web.  Then cut out the pieces leaving a 1/4" inch around each piece. Match pieces to color of scraps that you would like to use for that piece.  Blanket stitch with sewing machine or by hand using the color of your choice for that particular piece.

Attach black buttons, I used glass beads used in jewelry making, for eyes on Bo Peep and her sheep.

Blush cheeks using makeup or pencil (which on this picture I forgot to do).

Then embroider using how many strands of thread you want, I chose 2 strands of black, the words "Little Bo Peep."

I think the next block will be "Owl and Pussycat."  Check back and see how this quilt comes to life with each block.  I'm doing all 9 blocks!

In the meantime,
Keep on stitchin'

Connie

Thursday, October 3, 2013

Humpty Dumpty..........


What child or even parent doesn’t like Mother Goose Nursery Rhythms! Brings back a lot of memories when your children or grandchildren were growing up doesn’t it?

I want to talk about “Humpty Dumpty” today.  This is the first block of many nursery rhythms and the block finished measures 18” x 28”..  The first thing I did on this block was embroidered the “Humpty Dumpty” in black with 2 strands of embroidering floss.  The pattern called for 4 strands but I choose 2 strands because I didn’t like it that heavy looking so you will have to decide what you like. I also embroidered the mouth using 2 strands of thread.  Using scraps from your stash pick out a scrap for each piece in the pattern.  Trace each pattern piece on fusible web.  Hint:  make sure you transfer pattern on the glue side of your fusible web.  Be sure to leave ¼” around outside of pattern when you are cutting the fusible web out to iron onto material.  Iron onto the wrong side of the scrap that you have picked out for that pattern piece.  Now cut out each piece on the tracing line. Cutting on the tracing line will seal your threads and help with fraying edges.  Now remove the paper backing on your fusible web.  The next step is like putting a puzzle together.  Lay all your pieces out like pattern shows on your background fabric.  Remember dotted lines indicate where one shape overlaps another.  Iron in position when you are happy with layout.  Here you can iron the whole appliqué or iron piece by piece.  This is depending how you are going to blanket stitch your appliqué.  I choose to do it piece by piece with the blanket stitch on my machine.  I also try to use the same color thread to match the color of the material I am sewing on.  Sometimes I will just use white for a contrast so it’s up to you what colors to use.  They suggest you use color threads to match to appliqué shapes for a classic look or a darker shade of thread for a more dramatic look.  Attach buttons for eyes.

Doesn’t that look like a fun “Humpty Dumpty” that any kid would enjoy having for a quilt or wall hanging in his/her room? 

Check back and watch for more blocks from this series.

Keep stitchin……
Connie


Monday, September 16, 2013

Rag-Edge Applique


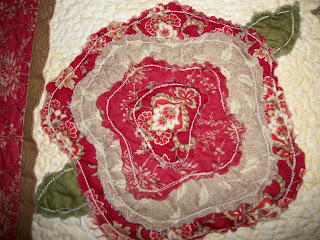
Today I want to talk about a different way to do edging in quilting. Most people will do appliquéing by needle turn, satin stitch, or blanket stitch but this one is called rag-edge appliqué.  This pattern is called “French Roses” by Heather French.  This is a fun project for everyone to try regardless how much you’ve quilted.  The rag-edge appliqué is done with each rose and gives it a nice soft edge around the petals.  After washing and drying (the more you wash the more it frays out) you will be amazed at how it looks, so soft and comes to life.


This type of appliquéing doesn’t have to stop with just flowers.  You can apply this to any quilt that has circles, another type of flower, anything that can be appliquéd.  Lynne Hagmeier, owner of Kansas Troubles uses this technique in her quilts.  She is a well known fabric designer for Moda fabrics, books and lots of patterns and is from the Bennington, Kansas area.  Check her out at http://www.ktquilts.com/ or http://kansastroublesquilters-lynne.blogspot.com/.  She has some fun things going on!


So here's a different way to applique.  Give it a try and see what you think.

So for now keep that sewing machine a stitchin,

Until next time,
Connie

Wednesday, September 4, 2013

Celebrate Christmas with Santas' Special Reindeer


Christmas in July!  Already here and only 4 months till Christmas.  Wow! Where does the time go?
So have you decided you're going to quilt something for your granddaughter, grandson or maybe just to give it to someone special?  You need to start thinking about what colors, design you would like to use and get started.  I'm making 3 quilts for grandsons and have 2 out of 3 done and ready for the quilter so I feel pretty good.

I'm going to call this a wallhanging and I think its so cute.  The size is 40 1/4" x 50 3/4" and could also be called a crib size.  How can you not like Rudolph?  This particular quilt was in "Quiltmaker" magazine, Nov/Dec 2012 called "Jingle Patch" on page 42.  This is from a Patch Pal's collection and is the last one of the series.  To see all the collections go to quiltmaker.com/patchpals. 

You can use a lot of your scraps on this quilt especially the green background.  The trees wouldn't have to be made out of the same fabric and there again you could use your stash.  It's just a lot of fun to mix and match with you're fabric.

So get in the Christmas spirit and start thinking about what you'd like to sew.  Hope you enjoyed the Reindeer quilt as much as I had fun sewing it.

Keep Stitchin,
Connie

Tuesday, April 30, 2013

Summer is for Flip Flops (Quilt)

Summer is almost here!  Well we know it’s coming but we’re really waiting for Spring to appear and stay.  One day we have 70’s even 80’s and then the next day we have rain, sleet or snow.  Winter just doesn’t want to leave Kansas for some reason.  I know the heat is almost here and I hate hot, hot weather.

This wall hanging I want to share with you today reminds me of Summer.   There are many styles of flip flops, many colors and all ages wear them.  These flip flops are made of bright colors with a flower design in the center.  On the straps I used different yo yo’s, a small circle and a small heart to finish off the straps.  The pattern had small flowers attached to the straps but you could try decorative buttons.   I used an eight inch square for the flip flops and then used the remaining material to make the straps. I then sewed the flip flops and center flower down with invisible thread after adhering them with Seam n Seam.  Templates for the flip flops and leaves (center) were included in the pattern. 

This pattern was in the “Quiltmaker” August 6, 2012 magazine named “Flip Floppy Flower.”  The lady that designed this wall hanging was on a trip to Alaska when she saw flip flops arranged in a giant circle attached to a wall of a shoe store.  This inspired her to make a flip flop flower quilt.  This should tell you that you can take any design from anything and make it into a quilt.

I made this quilt for my friend that owns a quilt shop “Kessler Kreations” in Hillsboro, Kansas.  She sells fabric, quilting supplies, has classes and does beautiful longarm quilting.  She does beautiful custom quilting.  If you’re ever in the area be sure to stop in and see her shop located on Main Street.  It’s really a neat shop.  Oh and she has kits for this flip flop wall hanging available.  Tell her you saw it on my blog. 

Well better get working on my next quilt. Thanks for stopping in and keep checking my blog for new quilt ideas.

Keep Stitchin,

Connie

Friday, April 19, 2013

Pinwheel Quilt...................

Well Spring is suppose to be here according to the calendar.  Once the calendar said its Spring then we get Winter weather.  We’ve had snow, sleet, hail and then two days later we have nice weather in the 60’s and 70’s with rain.  We need the precipitation so I’m not complaining.  Would be nice to put my coat away and leave it in the closet.  I keep telling myself it will get here then you’ll complain about it being to hot!  Never happy are we!!

Today I want to talk and show you a small quilt, 26” x 30” that I made my granddaughter, Mariah.  It is so much fun watching her with this quilt.  She’ll lay it across her lap and just rub her hands over it.  I’ve seen her laying on it and again just rubbing her hands on it.  She’ll sit there with it on her lap and look at her books.  I do believe she might like my quilts!  Maybe some day another quilter in the family?

This pattern is from the book Country Threads Goes to Charm School.  I have used this book numerous times because I love to use Charm Packs.  The pattern is called “Use A Napkin” because we have to remind our kids “Don’t wipe your fingers on the quilts – use a napkin.”  I thought that was cute.

To refresh your memory a charm pack is 5” x 5” squares and depending on the company you buy from charm packs can have up to a quantity of 43 squares in a pack.  For this quilt you will need 30 squares of different colors and ½ yard of the background material.  In the book is a mini windmill template, using with a  2 ½” square, that you can cutout of cardboard or acrylic.  I used the cardboard back from the charm pack.  Worked great! 

On this particular quilt you will cut the 5" squares in half.  You will get four windmills out of each square.  If you don’t have a charm pack you can cut 2 ½” x 20” strips of 10 different colors. Then use your template to cut the windmills out.

This is a fun quilt to make, a different type of pinwheel.  I like this pattern because you don't have all the bulk of material in the center.  This would also be a great quilt to use up scraps that you have.  I love the bright colors and so does Mariah.

Give this quilt a try and let me know what you thought of it.

Keep stitchin' and until next time, thanks for stopping in……..

Connie

Monday, April 15, 2013

Heritage Quilt

Reunions or family get together's are a lot of fun.  Let me tell you about one of our family reunions that was in the year of 2001.  When the whole family gets together they usually spend the reunion at one of the hometowns.  This particular one was held in my hometown, Hesston.  The family members that live in that town take care of all the  arrangements.  This reunion is usually held on a Friday until Sunday afternoon.


The reason I'm bringing up family reunions is because this particular reunion I decided I was going to make a "special" quilt" a "A Heritage Quilt".  A little background when this family gets together they have an action to help with the costs.  This turns into a highlight of the weekend.  Sometimes a family member would bring something old that had memories when they were kids.  This would usually end up in a bidding war if one wanted it really bad.  A lot of good fun and lots of laughter was during this time.

Back to the quilt!  I made a special quilt for the auction that year.  I started with pictures of the parents, which on the quilt was the center, this was Abe Willems.  I ask the brothers and sisters to give me photographs of each one of them now and there wedding pictures.  Any pictures of the family while they were growing up, pictures of the house, farming, church, anything that would make this quilt have history.  I ran the pictures off on muslin through my printer.  I surrounded the picture with a log cabin design.  As you can see I had the names of the siblings machine embroidered between the now picture and the wedding picture.  The first name on the block would have been the siblings name followed by the spouse and last name.  I hand quilted around each block and on the border I quilted connecting hearts.

This was really a fun project and I learned about the family history through this process.  It was fun gathering all these pictures and figuring out how to put it all together in a quilt and make it very interesting.   The quilt was auctioned off and bought by a son for his father and mother and headed to Portland, Oregon.  A lot of memories were hashed that weekend, laughter was plentiful, and a good time by all.

So does this inspire you to try a Heritage Quilt?  It's a lot of fun and the history you learn about your family tree. Try it!  Have fun with it!  See what you can come up with.

Keep learning and stitching,
Till next time,
Connie

Wednesday, February 27, 2013

Valentine Fabric Postcards

I have all this fabric so what do I do with it?  Yes, I could make a scrappy quilt but I found another use for this fabric.  It's making fabric postcards that you can actually mail through the post office like a postcard.  I know a lot of you out there, including myself, love to make paper cards but this is another way of making a card. 

I got interested in making these fabric cards quite a few years ago.  I started making these type of cards for my grandchildren on most all occasions.  Some of them have a photograph album with slip in photo sleeves and to put the postcards in them to save.  

This is how I make them.  The inside of these postcards are made with a stiffener interfacing which is about 1/8" thick.  The size of my postcards I make are 4" X 6."  Then I cut the same size out of Double Stick Fusible Web, quantity 2 per postcard.  Then decide how you want to design the card and what occasion it will be used for.  Fabric, bling, ribbon, lace, buttons really anything can be used.  As you can see on my Valentines Cards that I used letters from a game that I picked up at a garage sale. 

TIP:  If you're a garage sale person keep this in the back of your mind because there are usually sewing remnants, ribbons, rick rack, buttons, jewelry, etc. anything you can imagine can be used on cards. 

Back to making the card.  Iron on the fusible web to one side of the interfacing.  Then start cutting fabric, ribbon or whatever you're going to put on the card.  Another point.  If you have something bulky wait and put it on last because your last step is sewing.  Such as my letters on my cards, they were glued on when every step was done.  Once you are done with the decorative side then we'll move to the other side (front).  Iron on the second piece of fusible web and cut out of muslin or white material another 4" x 6" piece.  This will be the side you write the name and address of who you're sending it to (just like you would on a regular postcard).  On the left side write your message or if you have a special rubber stamp that you'd like to use stamp it.  Don't forget your return address.  Once the postcard is finished you will go to the sewing machine and sew around the outside on all sides a decorative stitch.  Then paste or sew on your bulky embellishments to totally complete the postcard.

As you can see in the photograph above you can make any postcards for any occasion and use them to decorate.  I do this especially at Christmas time because there are so many Christmas fabrics and accessories that you can use.  Special note!  Can u tell I love to watch birds?  Cardinals this time of year just really stand out because of there bright red. 

Now if you're postcards are flat you won't have any problem mailing them in the post office.  I would suggest if you have bulk that you put it in another envelope and mail it.  Infact, when a holiday came around the postmaster was excited to see what kind of postcards I had designed.

Hope you enjoyed this post and you will try to make a fabric postcard for a friend, grandchild, family member or whoever.  Keep checking back cause there will be other fabric postcards once in a while.

Till next time, Keep on stitchin,
Connie

Thursday, January 31, 2013

Fun and Fast Quilt......Bento Box.....

This has sure been a different week as far as weather here.  Monday we had temperatures in the low 70's, which is very unusual for January, then Wednesday we had freezing temperatures, wind and snow.  Blowing snow in spots where you just couldn't see.  This only brought a trace of snow but with the wind, blizzard conditions.  Our winters have really changed because now we
hardly ever see snow, a few days of really cold weather.  Our temperature's are usually in the 40 - 60's.  Which would be nice if we weren't so dry.  We need the precipitation but would rather see it in the form of rain. 

The quilt I want to talk to you about today is "Bento Box" pattern by Tracey Brookshier (Updated and Expanded).  This pattern has twelve new quilt designs that will work with 2 1/2" strips and additional block sizes that you can use.  It all depends how you assemble the blocks to what your quilt will look like.

The pattern suggests that you limit your color palette using 2 - 4 main colors.  Choose fabrics in pairs, such as one dark and one light, with a strong contrast between each pair.  Try to avoid using directional prints because if it bothers you that the strips is going the wrong direction this will drive you crazy.  This pattern suggests using fat quarters or fat 1/8's but you can also cut your own 2 1/2" strips if you'd like.

This is a fun and fast pattern and I like all the different ways you can use the strips.  Try this technique in your next quilt, colors you like, maybe a scrappy look?  I'm excited are you?

Till next time, stitch away,
Connie

Sunday, January 20, 2013

Swingin Monkey Strip Tubing Quilt...............

One of my favorite things to watch on TV is sports. I didn’t play sports when I was in school because in those days it wasn’t offered except for boys. Have things changed for the better I’d say. Anyway, I did play softball in the summer and also love to watch college girls’ softball and that’s come a long ways from when I played ball. Anyway now football is in the air, which team will go to Super Bowl! Another reason I have sports because I do have a TV in my sewing room and usually some kind of sports is playing. I can sew and listen, when yelling goes on I can check it out. So when there’s a game on, regardless what sport it is, I’ve got my TV on in the sewing room.

OK, I’ve talked about “strip tubing” in several of my blogs. I’ve got another quilt using the same technique but different material. This particular material has a theme of monkeys with coordinating material. Blocks that were left over were made into pillows with decorative fringe on each pillow. Wouldn't this look good in any child's room, boy or girls?

Have you tried making any quilts with this pattern? Check out this link, the first book "Strip Tubing" is the one I use. There are alot of different ways you can make these quilts, different sizes and explains how to use the  "Strip Tube Ruler" by Cozy Quilt Designs which also is shown on the same page (scroll down). This is also a great tool to have cause once you use this book you'll try several different quilts. Try it, increase your quilting knowledge by reading up on a new technique and let me know what you think

So here’s to more sewing and watching TV, football and/or football. What’s your pick?

Still stitichin,
Connie

Tuesday, January 15, 2013

Sunflower quilt blocks or postcards.........

Well the holidays are over so now maybe things will slow down a little that I can get back to blogging.  I’ve missed everyone so let’s get back to keeping in touch. 

I’ve talked about what you can do with panels but I found another product that is similar.  These are called “Quilt Blocks.”  These blocks measure 4” x  6” and a quantity of 4 in each package. These seed packets are one example of collectible prints.  Check out their website www.oldeamericaantiques.com for more images.   These quilt blocks are printed on 100% cotton sateen.  These are ready to sew and easy to quilt.

The prints I used in this wall hanging derived from vintage seed packets dating from 1880s through 1930s.  The pattern I used for these quilt blocks was a nine-patch which is included in the package.  This wall hanging measures 17” x 21” vertical but if you choose to make it horizontal it measures 21” x 17.” 

I live in the country, what use to be a big dairy farm.  My dad and his brother farmed and milked cows for many years.  They were considered one of the biggest dairy farms in the county.  So I grew up with Holstein cows, bottle fed calves, geese (which I didn’t like cause they chased us kids).  Really good memories.  Sorry, got side tracked there.  Anyway, we grew up with crops like wheat, corn, soybeans and milo.  These crops have many different colors to watch as they matured.  Sunflowers were everywhere but were considered wildflowers.  Now there are some farmers around here, not many, that will plant sunflowers for a cash crop.  The fields are beautiful when in bloom.  So these sunflower postcards, quilt blocks mean something to me. One of the reasons I love living in the country.

Check out these postcards and if you make a quilt or wall hanging please send me a picture.

Hope everyone had a great Holiday and everyone have a great 2013.

More stitchin a comin.........
Connie